TL;DR
Moving your rig into a closet can drastically cut noise and reflections. Focus on placement, sealing leaks, and ventilating properly to get a quiet, effective workspace. Foam alone won’t fix everything.
Imagine turning that cramped closet into a quiet, efficient workspace. It’s not just about throwing up some foam panels; it’s about smart placement, sealing leaks, and managing heat. Most of all, it’s about understanding what really makes a space quiet and how to use that knowledge to your advantage. For additional soundproofing tips, check out this guide on acoustic dampening and placement. You can learn more about indoor air quality and ventilation to optimize your space.
If you’re tired of the noise from your AI rig or home studio, this guide will show you how to make a closet work — without expensive construction or complex soundproofing. You’ll learn the best ways to dampen reflections, keep your gear cool, and create a space that feels more like a studio and less like a boiler room.
Acoustic dampening
& the rig in the closet.
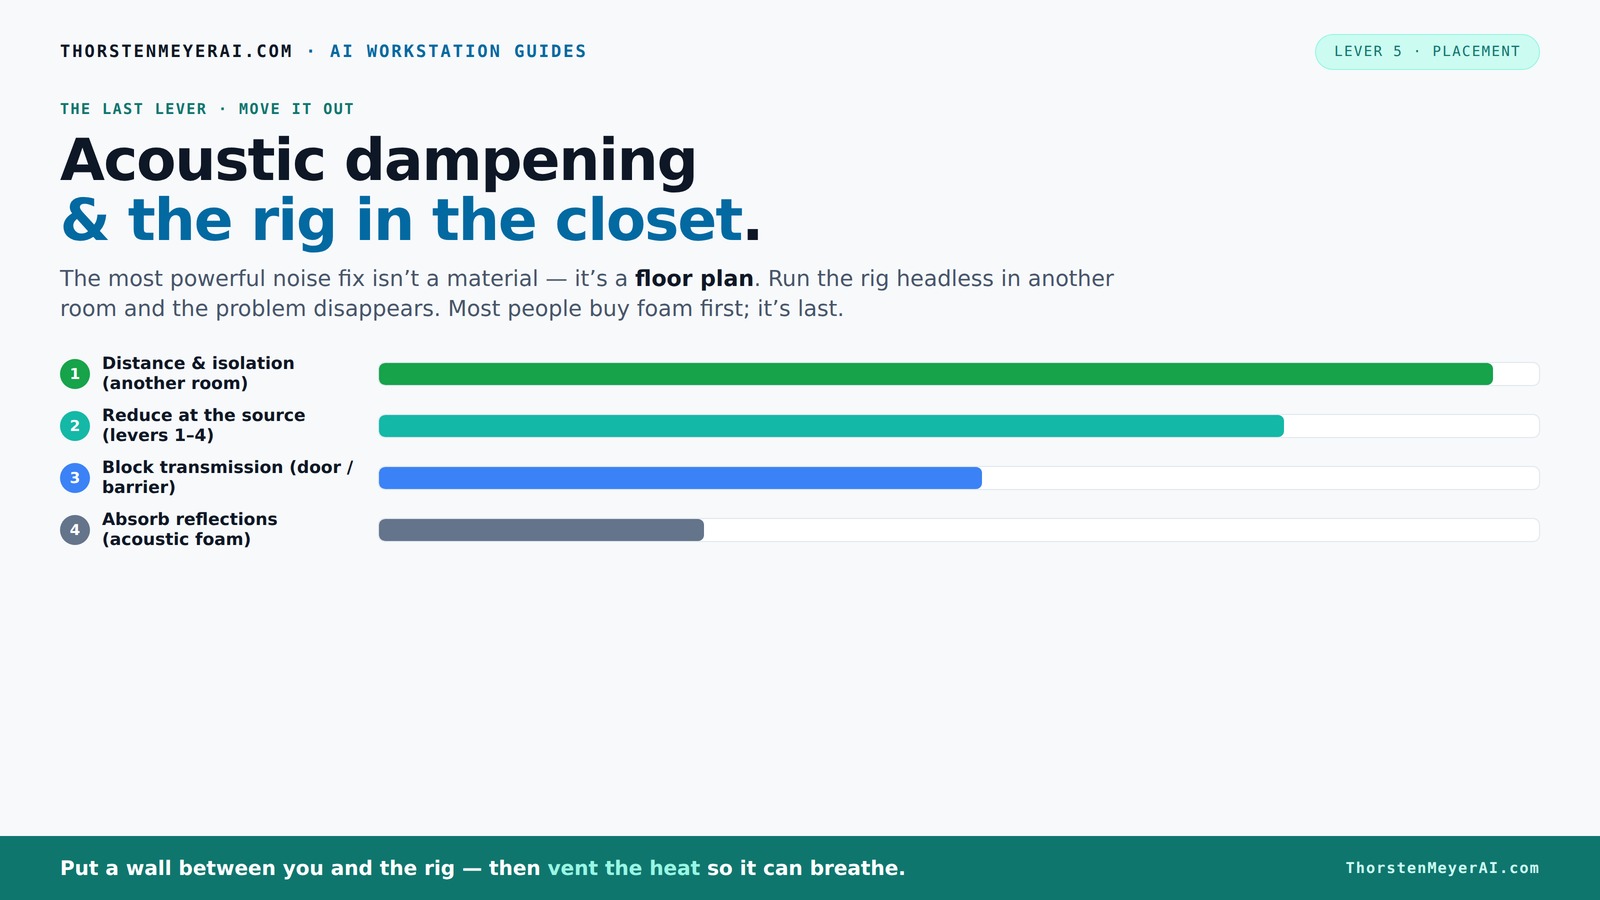
The most powerful noise fix isn’t a material — it’s a floor plan. A rig you can’t hear because it’s in another room beats any amount of foam. Tap the approaches in Part 1 to see what actually works.
(another room)
(levers 1–4)
(door / barrier)
(acoustic foam)
Contain the noise, not the heat
Key Takeaways
- Moving your rig to another room is the most effective noise reduction method — don’t rely solely on foam or sealants.
- Ensure your closet has proper ventilation to prevent overheating, especially if you seal it tight.
- Focus on treating reflection points—behind the mic, ceiling, and side walls—to improve sound clarity.
- Sealing gaps around the door with weatherstripping drastically cuts sound leaks. For more detailed sealing techniques, see this article on acoustic sealing and dampening.
- Use rugs and blankets strategically to absorb mid and low frequencies without deadening the entire space.

Focusound 52 Pack Acoustic Foam Panels 1" x 12" x 12" Sound Proof Foam Panles Soundproofing Noise Cancelling Wedge Panels for Home Office Recoding Studio with 300PCS Double-Side Adhesive
Soundproofing - Acoustic foam panels triangular grooves structure for better noise absorption, helps to reduce and absorb unwanted...
As an affiliate, we earn on qualifying purchases.
As an affiliate, we earn on qualifying purchases.
Why Moving the Rig Beats Adding Foam Every Time
The biggest noise reduction trick? Distance. Moving your rig to another room or closet puts a wall — and often a door — between you and the noise. It’s like turning down the volume without touching the speakers. An AI workstation doesn’t need to be right next to you; it just needs a fast network connection and good ventilation.
For example, I set up my GPU rig in the basement, across the hall. I SSH in, and I don’t hear a thing. The noise is completely gone from my workspace. That’s because the sound wave’s journey is cut short by just putting space and a barrier in its path.
This approach is the simplest, most effective, and cheapest fix. It’s the first thing to try before fiddling with foam or sealants.

2 Pack Studio Monitor Isolation Pads for Large Speakers Sound Insulation Studio Foam Prevents Vibrations Acoustic Speaker Isolation Pad High Density Fits Most Stands
Enhanced Sound Clarity: Saiqiang speaker isolation pads can reduce vibrations and resonance, providing cleaner, more accurate sound from...
As an affiliate, we earn on qualifying purchases.
As an affiliate, we earn on qualifying purchases.
The 'Rig in the Closet' Setup: How It Works and What to Watch For
Putting your rig in a closet is a smart move — if you handle the heat. Sealing a closet sounds ideal for noise, but heat becomes the enemy. A sealed space traps hot air, making your GPU and CPU work harder, which leads to louder fans and eventually throttling.
To make it work, you need active ventilation. A small exhaust fan or vent helps hot air escape, preventing temperature spikes. Many DIY creators use a quiet inline fan combined with ducting to keep things cool while suppressing noise. This setup balances sound dampening with heat dissipation.
For instance, I used a simple vented box with a thermostat-controlled fan. It kept the temperature stable even during long runs, and the noise level dropped significantly. Remember, a sealed closet without ventilation is a recipe for overheating and loud fans.

Audimute Soundproofing Acoustic Door Seal Kit - Door Sweep and Seal - (Large Size)
Includes (2) Door Seals (3/16" x 1/2" x 50') and (1) Door Sweep (1/2" x 1.5" x 25').
As an affiliate, we earn on qualifying purchases.
As an affiliate, we earn on qualifying purchases.
How to Silence Your Closet: Dampening, Sealing, and Reflection Control
Acoustic dampening in a closet isn’t just about foam panels. It’s about controlling what’s around you — walls, ceiling, door — and how sound bounces inside. Flat, hard surfaces create flutter echoes and a boxy sound that can ruin recordings or make your AI rig sound like it’s in a tin can.
To fix this:
- Line the walls with acoustic panels or blankets — especially around reflection points like behind the mic and ceiling. Learn more about effective acoustic treatment at ReviewSmill.
- Seal gaps around the door with weatherstripping or acoustic sealant to block sound leaks.
- Place rugs or carpets on the floor to absorb low-end reflections.
- Cover nearby reflective surfaces with soft materials.
For example, I used moving blankets on the door and a foam panel behind the mic. It cut down echo and made my recordings much clearer. The key is focusing on spots where sound bounces back, not just the corners or the walls.

24 Pack Black 12 x 12 x 2 Inches Pyramid Designed Acoustic Foam Panels, Sound Proof Foam Panels for Walls, High Density and Flame-Retardant Acoustic Panels, Sound Panels for Recording and Home Studio
Exceptional Sound Absorption:These pyramid acoustic panels are engineered to effectively absorb sound waves, reducing echo and reverberation. With...
As an affiliate, we earn on qualifying purchases.
As an affiliate, we earn on qualifying purchases.
Mic Placement in a Tiny Closet: Get It Right the First Time
Where you put the mic makes all the difference. In a small space, early reflections can muddy your sound or make your voice sound boxy. The goal is to place the mic where it captures your voice cleanly and minimizes sound bouncing back.
First, find the ‘sweet spot’ — usually a few inches away from the wall behind you and slightly off-center. Then, angle the mic towards your mouth and keep it close enough to reduce room sound but not so close it causes plosives.
For example, I set my mic about 6 inches from my mouth, angled slightly away from the wall behind. Using a small reflection filter helped reduce unwanted echoes, giving me clear, professional recordings even in a tiny closet.
Do You Need Bass Traps in a Closet? Yes — and No
Bass traps are designed to tame low-frequency buildup, which can make a tiny room sound boomy. In a closet, this is a common problem because small, parallel surfaces amplify bass signals.
If you notice your voice or recordings sound muddy or boomy, adding bass traps in the corners is a smart move. They help even out the low-end and prevent the “boxy” sound. But if your space is very small, sometimes treating the reflection points and using a good mic can do most of the work.
In my case, placing a bass trap in the corner behind the mic made a noticeable difference. It reduced the muddiness and made my vocals much clearer — especially when I was recording loud sources.
How to Seal the Closet Door & Surfaces Without Losing Soundproofing
Gaps around the closet door are the biggest leak points. Weatherstripping or acoustic sealant creates a tight seal, blocking sound from escaping or entering. For detailed sealing methods, visit this resource on sealing and dampening. This is simple but often overlooked.
Apply weatherstripping along the door frame and use a door sweep at the bottom. For extra sealing, add a layer of mass-loaded vinyl or a thick blanket outside the door for extra damping.
For example, I sealed my closet door with weatherstripping, and it cut down the sound leakage by at least 20 dB. The room felt much quieter, even with a high-power GPU inside.
Floor Treatment: Do Rugs Really Help in a Small Space?
Yes. Rugs and carpets absorb mid and low frequencies, reducing echo and making recordings sound warmer. For more tips on room treatment, see this aromatherapy and room ambiance guide. In tiny spaces, a thick rug can make a big difference by preventing sound from bouncing off hard floors.
On my setup, a dense area rug under my desk cut down on the dull, boxy sound and made everything clearer. Plus, it’s a quick, inexpensive fix that’s easy to implement.
Pro tip: combine a rug with wall treatment for best results, especially if your closet has a concrete or tile floor.
How Much Treatment Is Enough in a Tiny Closet?
More than you think — but not everything. Focus on the reflection points: behind the mic, ceiling, and the side walls. Covering these spots with foam or blankets makes a noticeable difference.
Start with a few panels or blankets, then listen. If it still sounds echoey or boxy, add more treatment. Don’t overdo it; too much can deaden the sound unnaturally.
For example, I began with panels behind the mic and on the ceiling. After testing, I added blankets on the door and side walls. It created a balanced, natural sound without making the space sound dead.
What You Can’t Fix in a Closet: Limitations and Expectations
While you can improve a closet’s acoustics, it’s not a full studio. You won’t eliminate all sound leaks or reflections, especially through the door or ceiling. It’s about making a space good enough for your needs.
Expect some residual noise and reflections, especially at low frequencies. The goal is to control what you can, like echo, reflections, and leaks, not to turn a closet into a recording booth.
For example, I accept some background hum on recordings but focus on clarity and reducing echo. It’s a compromise, but a very effective one.
Frequently Asked Questions
Is acoustic foam enough for a closet studio?
Acoustic foam helps reduce echo and reflections but doesn’t block sound leaks or low-frequency noise. It’s best combined with sealing gaps and strategic placement for the best results.What’s the difference between dampening, absorption, and soundproofing?
Dampening reduces echoes inside a space; absorption absorbs sound energy to prevent reflections; soundproofing blocks sound from entering or leaving. Each plays a different role in acoustic treatment.Where should I place my microphone in a closet?
Position the mic a few inches away from the wall behind you, angled slightly away from reflective surfaces. Use a reflection filter if possible for cleaner recordings.Should I treat the corners or the walls near the mic first?
Treat the reflection points first — behind the mic, ceiling, and side walls. Corner bass traps come second, mainly for low-end control, if needed.Do I need bass traps in such a small space?
Yes, especially if you notice muddiness or boominess in recordings. Placing bass traps in the corners helps even out low frequencies and improves clarity.Conclusion
Turning a closet into a functional sound space is about more than just slapping on foam. It’s a game of strategic placement, sealing leaks, and managing heat. Think of it like tuning a guitar — small adjustments make a big difference.
If you focus on airflow, reflection control, and smart placement, your closet can become a surprisingly effective workspace — quiet enough for recording, and cool enough for continuous use. The secret? Treat the space, not just the sound.